Showing posts with label Who wants a Clean House?. Show all posts

Saturday, June 18, 2011

Oh My Goodness, the state of my pantry...

Certain things escape me apparently when I am super focused on something else thats really important...school, kids, etc.

FYI- the empty spaces are only there because I had just moved 4 cases of canned goods....LOL.

My pantry has gotten away from me.  It has grown into a living thing, eating up countless forgotten items and hiding a family of mice....ew. I live in an old country house in Ohio....I think it's inevitable that we get them here and there, but I am not providing them with a place to hide. So, its time to clean the pantry. Its embarrassingly messy...

So, I am extending my posting of this and many more projects till Monday, after the tragedy that is my pantry has been fixed. Oh my, the day I have ahead of me....

Thursday, June 2, 2011

Labeling Fabric Storage Bins

This one was completely free thanks to the WM paint department. I needed to label my son's storage bins so he knew where everything went....trust me that this is crucial in my family. I, of course, wanted to spend as little as possible on this. I came up with the idea of using BH&G paint sample cards from WM. They are a nice thickness and already had a circle cut out so somehow I knew they were destined for something more...

I have a lot of projects in mind for these, amazingly enough one of those is to actually pick colors to paint my interior walls....so I don't feel bad, I'm just freeloading recycling.

I cut off the parts at both ends that were printed with my handy dandy x-acto knife. I cut the first one and then used it as a template for the rest so that they were the same size. I just hand wrote the contents on each label...oh if only I had my Silhouette...I will remake them and laminate them when I get it...but I digress... I dug and found some black wrapping ribbon and knotted them onto the handle of each fabric bin, tying them snugly. I then cut off the excess ribbon pretty close to the knot so that I could turn the knot to the inside and you'd never see any ends. And....Voila! Here it is, and my son loves it...he even thanked me :)
Now if only it could stay looking just like this...FAT CHANCE!

Tin Can Organization

This was what I started with.
We recycle. We feel an obligation to our earth to find ways to reuse things that would otherwise end up in a landfill. SOMETIMES my creative mind allows me to find ways to reuse items before they get sent to the recycling center. This was one of those times.

I wanted something to store my little girl's combs and hairbrush in, but of course didn't want to spend much money.

I had all of the materials on hand:
-2 tin cans
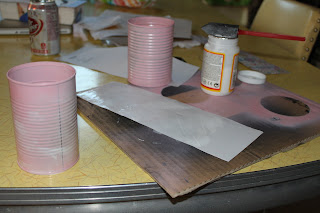
-gluing up my paper and painted cans

-spray paint (Sweet Pea by American Accents)
-scrapbook paper
-mod podge decoupaging glue

I started by picking out a couple of tin cans from the recycling bin. Then I scrubbed them up and let them dry before spray painting them. Once the paint was completely dry, I found some scrapbook paper that would look cute in her room and decoupaged them.

Decoupaging is as easy as gluing but it does take some practice to get professional-ish results. The glue goes on white but dries clear.  I also finish each item by putting on a final layer of mod podge over the entire surface to help 
-gluing the paper on
seal it. If you want a professional wipeable surface, finish 
with a polyurethane sealer. I find on items with texture, 
like this can, it works best to smooth the paper and glue down to the textured surface with your fingers. In hindsight (always), I would have used a darker paper because I somehow got it a little dirty distressed when using my fingers.

Also in hindsight, I probably will check to be sure that I put the paper on IN THE RIGHT DIRECTION. Two people watching me and a whole project later, I realized the paper was on 
sideways. Ugh. Live and learn, I guess. Thank 
goodness my daughter can't read yet anyway.
Here it is in action...now where are those combs?

After it dried, I put it into place and I think it looks 
pretty darn cute...and just in case you are wondering, yes I bought my one year old a jewelry 
holder and she only owns one pair of earrings.  I 
couldn't wait to have a little girl so I may go on 
girly overboard at times, don't hate on me for it.


I made two though...

So then I thought, what else can these be used for? Well, now I need to make a lot more because I am going to store the kids big pieces of chalk to take outside in one, crayons in another and a couple for my paintbrushes. I also have another idea but I am not going to reveal it right now....


So stay tuned for that exciting project...it is a 
really cool idea, so make sure you come back to 
check it out.

Wednesday, June 1, 2011

Mini-Project: Green Grocery List

This was really easy. I wanted to have a place to jot down grocery items when I use the last of something. I thought that it would be best if I had it near my pantry and fridge as well. I also didnt need one more thing cluttering up the walls....there is already plenty, so I settled on using chalkboard paint because its a pretty green medium, theres no paper to buy or recycle. I painted it on the inside door of a cupboard between my pantry and refrigerator. In hindsight, I wish I would have used painter's tape to mask out my shape instead of free handing it. Not that its too misshapen, I can live with it that way since its inside the cupboard. Another idea is to simply take a photo of the list on your camera phone before you head to the store. 

Saturday, May 28, 2011

Chalkboard Labels-

Here's another one thats just too easy...

I already had my chalkboard paint out, so I thought "What else needs chalkboarded around here?"

Well, here it is...Labeled Canisters, now you can just read whats inside instead of opening it up and breaking the air seal. All I did was put a double layer "swatch" on each one. I would have written on them for the picture but they were still a little bit tacky. I can't wait to label them!

Partin House Rules

I love the look of the subway art posters that are trending right now. I really like how it makes a visual impact and that you can put quite a few messages in one tight spot. I thought to myself...."Self, you can do that. You have Microsoft Word and a printer."  So, I attempted it.  It was harder than I thought it would be. Now you must remember, I am just learning to be crafty. I definitely learned a few things (as I usually tend to) during this project...


1. Your basic at home printer is only as good as the paper you put in it...duh. I'm sometimes too cheap for my own good...I had decided I wanted to craft a mat out of scrapbook paper and my cheap-o bright white printer paper just wasn't meshing well with it. I literally espresso stained some paper and tried to print on it before my darling hubby suggested I buy some nicer paper. BUY PAPER?, I thought? When I already have it on hand?!?!?!? But....he was right. Again. As usual.


2. Don't be cheap. Thought I just covered this? Clearly not thoroughly enough because I made a stupid mistake. Can you see the seam going up and down through the middle of the rules paper? That was me slicing out a big hunk of paper from behind the rules....hey, no one will see it anyway, right? Why not save some for another project? Duh....Not smart. It left the surface I decoupaged my rules to uneven, thus the seam....grrrr.


3. Use the best tools for the job. I used Microsoft Word because I know HOW to use it. I inserted a ton of little text boxes, set the font, colors and text and sized them all like a puzzle....it honestly took me over two hours to finish. I proudly showed it to the hubby when he woke up and he tells me it could have been made on Illustrator/Photoshop in less than half that time. I cant stand wasting time or money so I am going to have to bite the bullet and learn how to use the programs...I am a little bit of a techno-sissy.


Other things I used for this project- 


I had everything on hand so I didn't spend a penny on this project although I do need to replace the frame from my living room where there is now a blank wall.


11x14 black frame- took off a different wall
Krylon blue ocean breeze spray paint
2 pieces of scrapbook paper
x-acto knife
cutting mat
mod podge
designer printer paper (although I didnt realize the difference it would make)


All in all I am pleased with the way it turned out, though I do think that darn seam will probably bother me. What do you think?