Showing posts with label Healthy Eating. Show all posts

Monday, July 25, 2011

Blueberry Compote: Solving the Yogurt Dilemma


My kids love yogurt...
seriously, love it.

But, they don't all like the same kind.
Therein lies the rub.

Ethan likes fruited yogurts, but he doesn't like fruit mixed in.
Owen doesn't like even ONE TRACE 
of fruit in his (he is SO picky).
On the other hand, Stella will eat anything...?
So, what is a Mom to do?

Here is what I do:

I buy vanilla yogurt in a large container and give it to Owen as is...
I give Ethan vanilla yogurt with fruit topping and
I give Stella(who is under two and super messy) yogurt with fruit topping mixed in (to avoid stains).


I make a fruit topping anytime I have a small amount 
of fruit that I dont know what to do with 
or when something is spoiling needs used up.

It is beyond easy.
The pectins in the fruit act as a binder.


Blueberry Compote-
1 cup turning fresh blueberries
1-3 Tbsp of sugar*
¼-½ cup water**
*amount of sugar needed depends on the sweetness of your fruit, it is important to taste your fruit
**start with smaller amount of water...add more if needed so the fruit has something to cook in

Add all the ingredients to a small saucepan and heat on medium to medium high heat, stirring often until berries have burst, and sauce has thickened. Store in the refrigerator in an air tight container for up to two weeks.


This fruit topping is great on yogurt, cheesecake, 
ice cream or even in smoothies or milkshakes.


Monday, June 27, 2011

Taking the mess out of pancakes-


I have toddlers and try to avoid giving them things that are super messy to eat. 
Call me lazy if you want, Whatever, I just dont like cleaning up unnecessary messes.

I have adapted a basic pancake recipe to include sweetness 
without having to give your child syrup...syrup is a mess.

I just add a few Tbsp of fruit preserves to the liquid in my pancake recipe, 
breaking it up with my hands to create chunks but not mixing it all the way up.


Then, mix up your batter and cook them as usual.
my kids don't even ask for syrup...and think of all the sugar they aren't getting!

Monday, June 20, 2011

Using up old cherry tomatoes-


I hate to waste, so anytime I see produce turning, I find a way to use them up right away. Here are some other examples....for avocadosbananas, and raspberries.


Anyway, this time it was cherry tomatoes going bad when I woke up...


Put your washed and dried cherry
tomatoes into a baking dish with a few 
Tbsp. of olive oil, a few peeled garlic 
cloves and salt and pepper. 
Mix and roast in a 400 degree oven 
until the tomatoes start to 
shrivel up and pop open, 
my oven takes about 15 minutes.


Then you have to help them along a little with your potato masher, on harder chunks it helps to rock the masher back and forth over the product. I learned the hard way to use a deep dish pan so you 
aren't splattered with hot tomato juice.


Keep on smashing until you get a nice, even sauce.


Next fold in cooked pasta, I think that cappellini works best because the sauce gets integrated into the pasta better.


After your tomato mixture and pasta are well blended, top with finely shredded parmesan cheese and adjust the salt and pepper to taste.


And there you have it, a clever way to use up tomatoes that are passing their prime, 
and it only takes about 15 minutes!


Sunday, June 19, 2011

Outsmarting my Hubby-Homemade Sorbet


I am on a mission to use every small appliance in my pantry soon so that my husband doesn't have an excuse to get rid of anything.


One day last week, I woke up to this...

raspberries going bad. Ugh.


I saw it as a perfect excuse to use
my ice cream/sorbet maker that usually sits
and collects dust..


For the full recipe, go here.


Start by pureeing the berries in your food processor.


(Lucky me, I got to use two appliances for this project)


Next, you need to separate the seeds from the pulp.     I used a fine mesh screen, but if I had been thinking, I would have used the long forgotten food mill I just found while cleaning out the pantry,
having successfully used THREE items for
one project...


Then, boil your sugar and water, essentially making a simple syrup just like in my coffee syrup tutorial, over here.


Um....yeah, STILL too hot.
 Next is the part I have the most trouble with.
PATIENCE! The syrup has to cool to room 
temperature, and I am SO impatient that I 
had to watch the temperature go down.


I eventually left the room and started 
another project so when I came back to it, the syrup 
was exactly where I needed it to be...


After the syrup has cooled, mix the berry puree and 
syrup mixture together adding the corn syrup and 
blending well. Then, put that mixture into your ice 
cream machine and turn it on.

NOTE: your ice cream frozen sleeve insert thingy
must be frozen SOLID for this to work...
no freezing it for a few hours and thinking it will be OK. 

No, none of that, it must be frozen absolutely solid.

Oh, and dont forget the paddle arm, like I did...ha!

EVENTUALLY...
you will get frothy, then slushy, then frozen sorbet....oh and if you are wondering why there are seeds after I removed them....I added some back in, and some chopped raspberries because I wanted more texture. I havent decided if that was a good idea or not, all I know is that it turned out DELICIOUS!

Tuesday, June 14, 2011

Nothing says LOVE like homemade noodles...

I love carbs, sure they want to glue themselves to my midsection, but I love them still...
NOODLES have got to be my #1 favorite carbohydrate. I love pasta.
Sometimes, I find a dish at a restaurant that I like so much I have to learn how to recreate it.
This one was inspired by Bob Evans Chicken and Noodles.

  • I started with a whole chicken, cut the legs, wings and thighs off and set them aside.
  • Then, I took the carcass with the breasts still attached and cut the breast meat off and put it aside as well. (I wrapped the breast meat up and put it in the fridge for another dish because I have learned to skimp on meats in casseroles and soups...saves money and calories)
  • I washed and cut 3 carrots, 3 stalks of celery and one large sweet onion into huge chunks, set aside.
  • In a large, hot stock pot (med-hi), add about a 1/4 cup of olive oil and your veggies, legs, thighs and wings, breastless carcass, S + P, a big pinch of rosemary and thyme, 1/2 tsp. each of poultry seasoning and garlic powder, 3 whole bay leaves and 3 crushed garlic cloves. Sautee everything together on medium high heat, letting everything brown up on all sides....this means you have to stir often and keep an eye on it....it will probably take ten minutes.
  • After everything is nicely, LIGHTLY browned, add about 2 gallons of water and bring it all up to a rolling boil.  Boil mixture for about 10 more minutes and take off the heat. REMOVE CARCASS AT THIS POINT BEFORE ALL THE TINY BONES START TO FALL APART!
  • After its cool enough to handle, remove the veggies, garlic, bay leaves, chicken parts and any other solids from the soup and set aside. 
  • Put the broth back on the heat and lightly boil it down, reducing the liquid by about half, then take off the heat and add half a stick off butter.
  • Once your chicken pieces are cool enough to hold, pick all the little yummy bits of chicken off the bones and put it back in your broth.
  • Bring back to a boil and add your noodles, I have not been able to find the type I was looking for in the store, so I decided to make my own. I wasn't crazy about the results so I am not going to post the recipe, but it was just a standard egg noodle cut thick. 
  • Once your noodles are cooked through, taste your broth and adjust your salt and pepper as needed.


Monday, June 13, 2011

Outsmarting my Hubby...

OK- So, really I am not being bad...not exactly. My husband thinks I have too many things that I don't use and has recently mentioned possibly getting rid of said items...Uh, no...I don't think so. He and I have different views on what types of items are "keepers". He would honestly prefer for me to get rid of everything that's not in daily or at least weekly use. Not me. If I use my huge turkey roaster only once a year, I'm keeping it. What about my food dehydrator or ice cream maker? Or my collection of vintage silver platters or my beautiful wooden salad bowl set...I dont necessarily USE these things, but I am certainly NOT getting rid of them. I am in culinary school and plan on doing some private chef/catering and see NO reason to get rid of things I will have a future use for. SO....I needed to come up with a way to keep my stuff. Hmmmmm.... 


Well, he cant complain about me having stuff I dont use if I use them...
So my goal this week is to each day, use one of my kitchen gadgets that dont see much rotation.
AND, I'm going to blog about it for all of you....FUN!


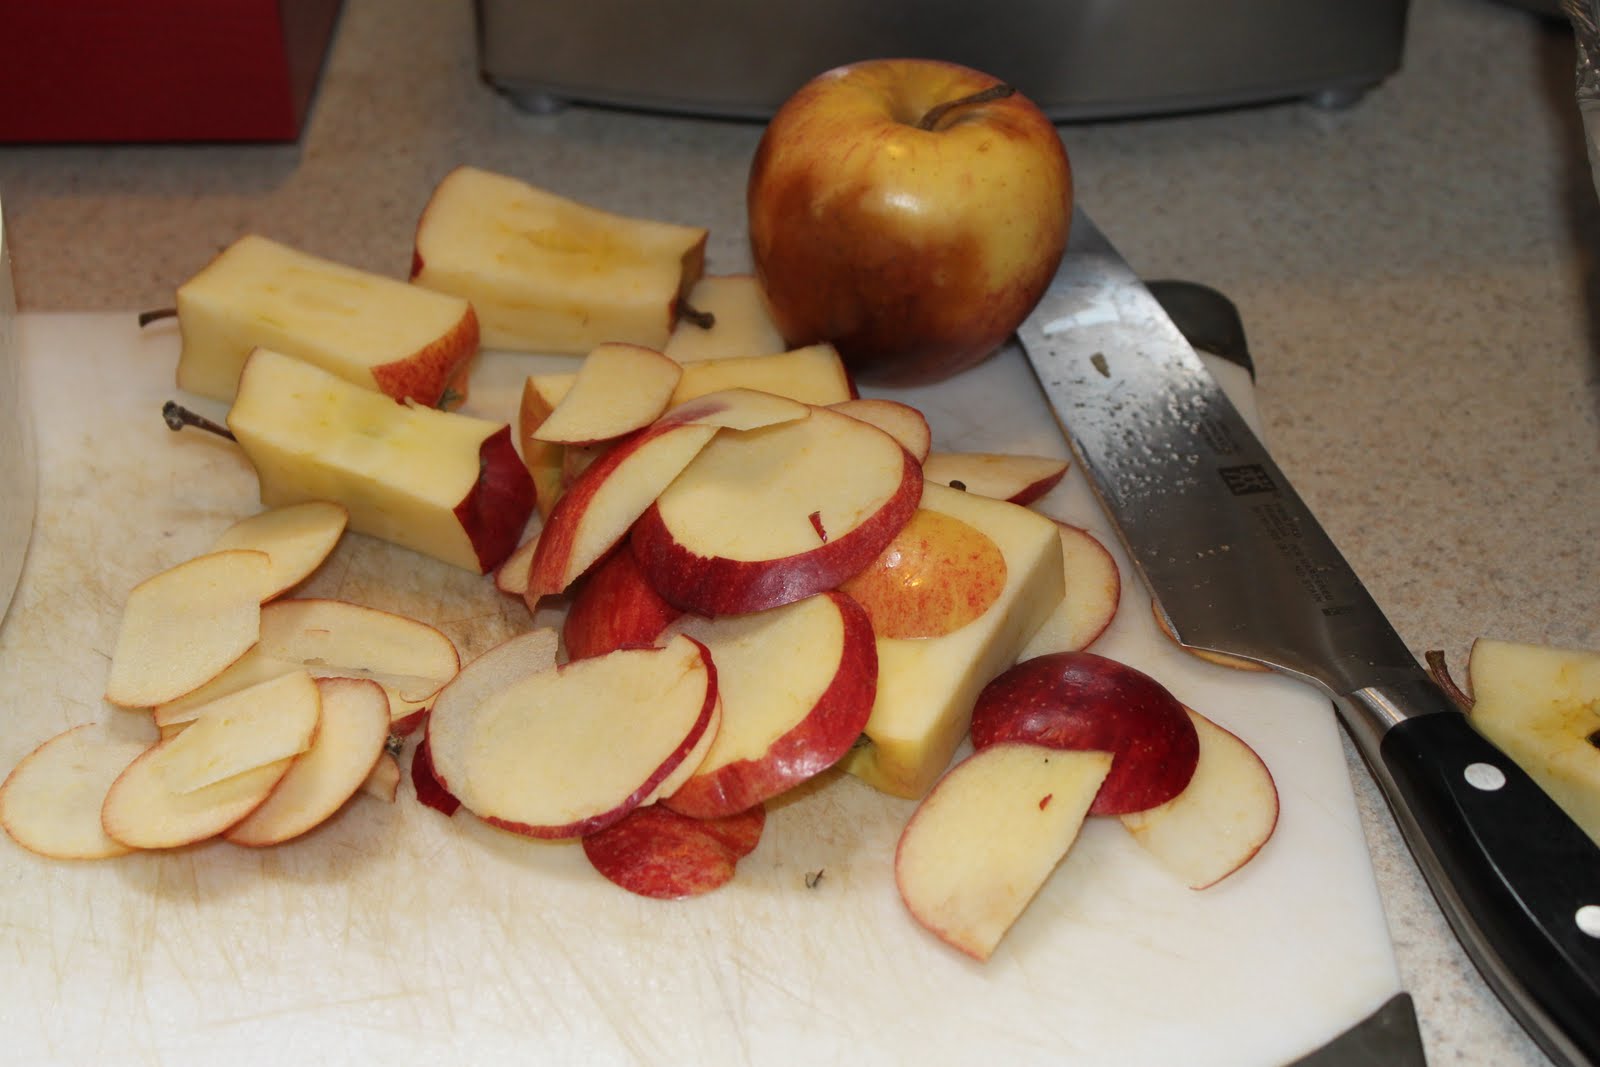
Today I woke up to browning apples. I hate to waste, I tend to make applesauce or apple crisp when my apples start turning, but today I decided to break out my massive food dehydrator. We got it for Christmas 2010 from my Grandma Carole. Thanks, Grandma!


I sliced my apples super thin, cutting off any brown...this is way easier with a very sharp knife. I have J.A. Henckles and ADORE THEM, but they were very expensive. Awesome investment....but I digress.

Then you arrange them in a single layer in your drying trays.


Then stack it all back up together and turn it on, using your manual to decide on the temp...mine says 135 for fruit.

Sometime today we will have healthy apple chips for snacking on, the kids will love them!

Thursday, June 9, 2011

NO MORE CHICKEN NUGGETS!


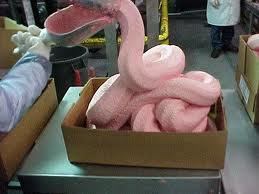
In fact, no more chicken patties, chicken "fries" or any other over processed chicken product. Not for me or anyone I love. Why, you ask? Enter..."mechanically-separated chicken".


Mechanical separation of meat is a process developed to pick every bit of usable "meat" from the carcasses of the birds. This includes everything from brains to eyeballs. They squish everything but bones through a fine mesh screen, filling it with nasty bacteria. To kill the bacteria they have to soak the "meat" in AMMONIA. Then they have to change the ghastly color and add 
flavorings because of course it has 
to taste absolutely disgusting. 


WANT A CLOSE UP?
-------------------------------------->


Here's what Wikipedia has to say about it-


The practice of mechanically harvesting meat that would otherwise be unusable dates back to the 1950s, when mechanical hand tools were developed to help remove these scraps and minimize waste. By the 1960s, machines were developed that did this more efficiently and automatically. This allowed companies to use these less expensive raw materials and, in turn, offer these products to the public for a lower price. During the 70s these techniques were slowly starting to be more in common in other parts of the world as well. Not only poultry slaughterhouses have been applying these techniques, also newcomers entered the market as they saw the enormous possibility that lay before them, concerning the transformation of low-valued poultry items into good quality raw materials for further processing. In Europe, Polskamp Meat Industry is seen as one of the pioneers in this type of industry and current market leader. Their success lies in the fact that they were one of the first companies able to provide added value to items that otherwise would have been considered as waste to poultry slaughterhouses. Furthermore, mechanically separated meat from Europe can be seen as a product with a rich history in terms of export. Because of their relatively low value combined with high quality and high European standards, it has always been a product perfectly suitable for export to other parts of the world. Especially Eastern European countries are known for their import of frozen chicken MSM. 

Tuesday, June 7, 2011

DIY-Flavored Coffee Syrups

Adding my "tsp" of vanilla...such precise measurements.
We have an espresso machine so we know first hand how expensive the flavored syrups can be. A small bottle costs over three dollars and you get about  12 oz...

Well, mine costs about fifty cents for that much. Put 2 cups of water and one cup of sugar in a saucepan and boil, stirring often until sugar has dissolved. Remove from heat and add a tsp. of vanilla or other extract. I also use those tiny candy flavorings, but you'll only need a few drops of those...start with a little and taste.
Store in an airtight container for up to two weeks.

Hotdogs with steamed buns...


 If you've never had a hotdog in a steamed bun, you're missing out. If you have you know it's the only way to go.. I have a super simple strategy that has made hotdogs fashionable again in this house.

And just in case you are wondering, they are all angus beef dogs with NO mechanically separated "meat".

After my hotdogs are done, while the burner is still on, I put a metal baking rack on top, then put the buns on the rack and add water to create to steam. So easy!

DIY-Cajun Blackening Seasoning


  • 1/3 cup salt
  • 1/4 cup chili powder
  • 1/4 cup paprika 
    • ( I use smoked paprika,but you could use hot)
  • 1 Tbsp. onion powder
  • 1 Tbsp. coarsely ground black pepper
  • 1 Tbsp. dried basil
  • 1 Tbsp. dried oregano
  • 1 Tbsp. ground coriander
  • 1 tsp. white sugar
  • 1/2 tsp. cayenne pepper
  • 2 tsp. dried thyme
  • 1/4 tsp. cumin
  • 1/4 tsp. white pepper
Combine all ingredients well and store in an airtight container, I use an old pickle jar. 

Friday, June 3, 2011

Eating Better #3- Antioxidants and Omega 3's


The following is not original content...I have a research paper due on Monday and finals all next week so I am taking a break for a few days.

Antioxidants

An antioxidant is any chemical compound or substance that inhibits or reduces oxidation damage caused by free radicals. Antioxidants are found in green tea, tomatoes, carrots, and soy foods, as well as in vitamins A, C, and E .
Antioxidants such as vitamins C and E, carotene, lycopene, lutein and many other substances may play a role in helping to prevent diseases such as cancer, cardiovascular disease, Alzheimer’s disease and macular degeneration.


OMEGA-3 Fatty Acids- 

Omega 3 fatty acids are simpler than they sound. Besides being the “active ingredient” in fish oil, they're nutrients. Along with other vital nutrients like protein, carbohydrates, and calcium, our body needs omega 3 to develop and to keep us healthy. Like other nutrients, though, omega-3 fatty acids are usually something of which we just don't get enough, which is why many health-conscious consumers take fish oil supplements.


Omega-3s are part of a group of “essential fatty acids,” or EFAs. Our bodies can't manufacture them, so we have to eat them because we can't be healthy without them. 


Chronic diseases like depression, arthritis, 
ADHD, heart disease, cancer, Alzheimer's, 
and type-2 diabetes are all linked to a lack 
of essential fatty acids. Omega-3s are also 
critical for the brain development of fetuses, 
babies, and growing children. Some researchers even think that omega-3s were responsible for the complex evolution of our human brains.


Tuesday, May 31, 2011

Eating Better #2

Addictive and Super Simple Steamed Broccoli-
When I say this is addictive, I mean it. I seriously eat this as a quick snack a few times a week.  And its so simple, if your kids are anything like mine they'll be eating it faster than you can make it.

The most important ingredient is a good steaming dish. Any good microwavable dish with a tight fitting lid with a vent will work. I suppose if you are super careful about watching it, you could probably use a non vented dish, just be careful. You can also adapt this recipe to use different herbs and spices or even different fresh veggies.

You will also need:
-a head of fresh broccoli
-2-3 pats of butter
-light sprinkling of garlic powder
-pinch of red pepper flakes
-kosher salt and fresh cracked pepper to taste

The Method:
-rinse your broccoli well and cut off florets with a sharp knife.
-I fill my small dish VERY full with the broccoli- it just seems to work better that way
-arrange butter slices on top of broccoli
-sprinkle with dry seasonings
-put your lid on tight and microwave for about 3 minutes.
 Microwave times will vary upon model and wattage.

That's it, let me know if your family likes it as much as we do....Maybe we are just odd?

Monday, May 30, 2011

Eating Better #1

Chubby.
Overweight.
Pleasantly Plump.

Fat...in my twenties.

Fat...in Colorado.
Fat...in a Dorothy costume.
 I have heard them all. People can truly be cruel. If you are reading this and you used to be one of those people who made me feel so horrible about myself....screw you. Don't try to flatter me now by reading my blog. But I must admit, the memory of all the hurtful things said to me has fueled me to change my situation.

Since adolescence, I have yo-yo'd back and forth between a 14 and an 20, through the birth of three children and countless other life events. The real culprit was poor eating habits, not at all helped by low activity. I really love food, I am in school to become a chef so I love to cook...and eat. I also have three children, ages one, three and nine. These kids are hard to please all at once, so I was giving in to my busy schedule and letting them have McDonalds a couple times a week. Not a good idea. I realized this one day when my three year old turned down a PB+J and told me he wanted "Donald's fries" and proceeded to scream himself into a fit.

OK, something needed to change...I am a smart mom and a great cook, so I figured I could make them food that was better for them, feed their brains and that they would actually want to eat. I knew it was going to be a challenge to change their palettes but I figure I have nothing but time. Then I decided, why not keep a record of all the recipes I try to help other moms feed their kids healthier? I also decided to try to keep each meal under $4 per person....stay tuned for more recipes as I make them for my family.

Eating Better Recipe #1

Kid Friendly Salad Nicoise-
Green vegetables, a "fruit", hearty potatoes and plenty of protein make this a great dish for the whole family. It is traditionally served with the eggs cold, potatoes warm, and the rest at room temperature, giving it more layers of interest. I boiled my eggs and potatoes ahead of time and then right before serving, I cut my potatoes in half, tossed them in salt and pepper and good olive oil and grilled them cut side down until warm. I serve mine with home made garlic toast.


-boiled red skin potatoes (when i was ready to serve, I tossed them in S+P and EVOO, cut them in half and grilled them till warm,)
-cherry tomatoes
-hericot vert, steamed (pronounced hairy co-vair...its just long french green beans, I found mine @WM)
-hard boiled eggs
-albacore tuna (the classic recipe calls for a rare tuna steak...which my kids wouldn't like)
-black olives (kalamata is the norm, but again, not for the kiddos...I had mine on the side for the picture)
-lemon basil vinaigrette

Arrange all the ingredients on a family sized platter and either toss with the vinaigrette or serve the vinaigrette on the side.

Lemon-Basil Vinaigrette-
1- 1½ tsp. dijon mustard
the juice of 1-2 lemons (taste them before you use them, I have ruined many sauces with a bitter lemon)
¼-⅓ cup of good extra virgin olive oil
2 Tbsp. of fresh basil chiffonade* or a good pesto
kosher salt and fresh cracked pepper to taste
-----> Starting with the smaller amount listed, put all ingredients into a small recycled jar with a lid and shake away until emulsified.  Taste and adjust the amounts as needed to taste.
Store in fridge but use at room temperature.


* To chiffonade basil (or any fresh leafy herb) take your leaves and stack them one by one on top of each other like pages of a book. Then take the whole stack and roll it into a tube shape. Then cut lengthwise across the "tube" of basil. When you loosen your strands you will have something resembling confetti. DO NOT DO THIS STEP AHEAD (unless you are putting it right into a recipe) as you will bruise and damage your basil too far before its use.

Saturday, May 28, 2011

Avocado Tricks

I have heard it through the grape vine....hehehe that some people are intimidated by avocados. If you fall into that category or just dont know to treat them, then this post is for you.


Halving and Coring an Avocado
Stand your avocado on its fat bottom and slice straight down through the core on top until you hit core. Then with your knife blade still against the core, turn your avocado until you have cut all the way around. Remove your knife and take one half of the avocado in each hand and twist in opposite directions. You should now have two halves with the core in one half. Take your large chef's knife and whack the heel (nearest part to the handle) of your blade into the core, wedging it in. Twist knife, which should twist your core right out without disturbing the avocado's flesh.


Slowing your avocado's browning-
For short term (couple of hours) preservation, rinse your halved avocados in very cold water.
For longer term preservation (1-2 days) spritz lemon or lime juice over avocado half. Of course then seal in plastic. If preserving a mashed avocado (guacamole) make sure to put plenty of citrus juice on every surface that hits air and top with a lid. AIR is the browning enemy. 


Dicing your halved avocado
Cut straight parallel lines across your avocado with about 1/4-1/2" in between, going slow so that when you hit your peel you stop, not cutting through it....just up to it. You could even use a butter knife for this step. Next turn your avocado 180 degrees and do the same thing going the other way. When you are done your avocado should look like this one. Then simply either turn your avocado peel inside out, releasing the flesh OR peel away the peel. Either way you will have lovely square avocado cuts.