Sunday, October 30, 2011

Mercury Glass DIY

There have been a lot of mercury glass
items in all of the major designer retailers
like Pottery Barn and Ballard Designs.

There was one such item in a Ballard Design mag
I was perusing that I coveted...but not at their price tag.
Photo courtesy of Ballard Designs
Price tag- $29-$39 each

I have seen tutorials all over blogland,
but with so many I had no idea which one to choose.
So I read about thirty to get a general consensus,
which was to spray light layers of water and spray paint
on the INSIDE of said item, then blot parts off
and repeating until you achieve the desired effect...
and they all agree to use only one product and one product only,
Krylon Looking Glass Spray Paint.

Here is what I started with, a .50 glass garage sale vase.

And here is what I ended up with...


Love it, but who doesn't love a good before and after?


Sunday, October 9, 2011

Halloween Apothecary Jars

I started my Halloween decor.
Most of it is silly because I have small children,
and don't want to scare them.

Here is one that scared one and grossed the other two out...

LOVE IT!


There are my leftover gourds and pumpkins...

and yes, those are

FINGERS!!!!

I couldn't resist.
I bought them for $1 at the dollar tree,
and used an apothecary jar I already had.
The black netting is the bag the fingers came in,
cut to shreds and laid in the bottom as filler.

For our Halloween party, 
I plan on adding more jars and making a
"mad scientist" lab area.
The jars will be filled with things like:
gummy teeth, chocolate eyeballs
and more.

These three jars cost me about $2 to fill.
See? You can decorate and have fun for cheap.
Stay tuned for more...


Thursday, October 6, 2011

Getting the Halloween Itch...

I have already been thinking about
HALLOWEEN
for a few weeks now.

Last year, I bought up as many cute costumes
as I could find for my little ones 
while they were 90% off at K-Mart, 
so I know I have plenty, I just havent gotten them out yet.

In the meantime, I thought I'd play
with my photo editing software
and post pictures of last year's costumes.

ENJOY!
Wait, what is a picture of
Judy Garland doing in here...
Just joking, that's me as Dorothy.


Ethan went as Dracula~


Owen went as Yoda~
The perfect size, he was.


Happy, he was not.


Baby Estella was a pretty little ladybug~


Snug as a ladybug in a rug!


Super Scary Ethan~

Can't wait for this year!
I LOVE HALLOWEEN!


Tuesday, October 4, 2011

Fall Harvest Wreath


This will probably be my last fall decor post.
(until it's time for Halloween decor)
Unless I come up with another frugal idea...
This one cost me about $8.
I KNOW...
Big Spender!

  • Here's the rundown of my materials:
  • rattan style cheapo wreath from Dollar Tree- $1
    • spray painted with Krylon glittery brown spray paint left over from this project- had on hand
  • fall silk leaves from Dollar Tree- $1
  • larger plastic pumpkin from Dollar Tree- $1
  • set of orange pumpkins and gourds from the dollar tree that I ended up not liking the color of with the other pumpkins and spray painted- $1
    • Rustoleum Antique White- on hand
  • 2 sets of cat tail and leaf sprigs for fifty cents each- $1
  • Nicer and larger set of mini pumpkins at Walmart-$2.88.
  • pinecones- free from my yard
  • glue sticks and glue gun- on hand

(perhaps this is not the last fall decor post...I have more pumpkins)

Here are some during the process pictures-


Here is the 
wreath being
painted.


Here is the 
ugly pumpkin
and gourd
set being
painted.


After everything was nice and dry,
I warmed up my trusty glue gun
and arranged and glued until I liked the way it looked.


Do you like the way it looks?
(Look past that smidgen of pantry...
that IS organized!)


How about a close up of the goods?


Just one more-
in its new official home.
(Until it gets close to Christmas!)


Fall Coffee Table Centerpiece for $1

Here is another fall decor post.
This is one anyone can do.
Really, anyone.

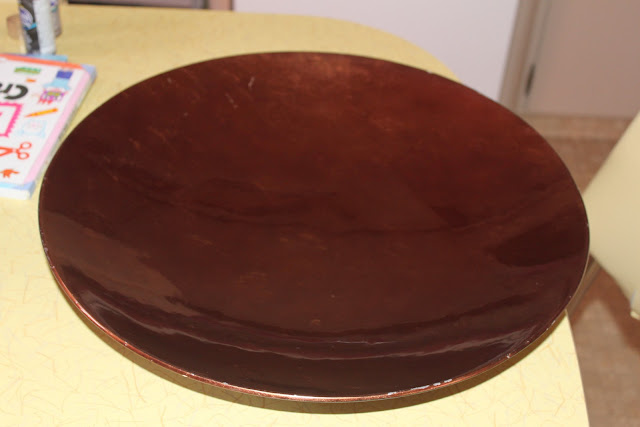
I started with this

I actually liked the original color,
but with the nicks and scratches,
I can see why they would get rid of it.
When I saw it at a garage sale for ten cents, I snatched it up. 

Knowing I had the amazing power of spray paint at my fingertips,
I took it home figuring that at some point, 
I would have the inspiring moment of clarity
where I knew what I'd do with it.

That moment of inspiration came when considering fall decor.
I found a set of cute little white pumpkin candles 
at a rummage sale for fifty cents, 
and had some leftover leaves from this project.


Then I went about painting the (platter?).
I couldn't decide between brown and black.
I chose black thinking that I could reuse that more easily 
in other seasons decor than I could with brown.
Holly or garland and a candle at Christmas, 
a votive in a pile of red and silver kisses for Valentine's Day


Of course I forgot to take a picture of the painting process.
You are lucky to have gotten a before picture,
But here is an after...


All that loveliness for less than a dollar.


LOVES!!!

Sunday, October 2, 2011

Beautiful and Frugal Fall Centerpiece


I got to shop at one of my favorite sales this week.
It is hosted four times a year by the senior citizens organization.
There are so many treasures to be had...
and VERY cheap.

I have been looking for a large bowl or wide vase
to fill and change out with the seasons 
to be used as a centerpiece at my kitchen table.

I found exactly what I was looking for.
And my silly self almost walked away 
because of the $3.50 price tag.

Now, that is one cheap lady.
I'm not proud.

But I did snag it after all.
For Halloween, I thought about filling it 
with plastic skulls and a string of lights...

But for now...
I filled it with pinecones from my yard
that I have had "curing" for a few months,
and some silk leaves from the dollar store.

Filled for fall for a grand total of $1.

ISN'T SHE GREAT?
Are you as overcome with the possibilities as I am?
I am excited to find things to fill it with for each season.

Let's take another look at her.

Just one more...