Sunday, October 30, 2011

Mercury Glass DIY

There have been a lot of mercury glass
items in all of the major designer retailers
like Pottery Barn and Ballard Designs.

There was one such item in a Ballard Design mag
I was perusing that I coveted...but not at their price tag.
Photo courtesy of Ballard Designs
Price tag- $29-$39 each

I have seen tutorials all over blogland,
but with so many I had no idea which one to choose.
So I read about thirty to get a general consensus,
which was to spray light layers of water and spray paint
on the INSIDE of said item, then blot parts off
and repeating until you achieve the desired effect...
and they all agree to use only one product and one product only,
Krylon Looking Glass Spray Paint.

Here is what I started with, a .50 glass garage sale vase.

And here is what I ended up with...


Love it, but who doesn't love a good before and after?


Sunday, October 9, 2011

Halloween Apothecary Jars

I started my Halloween decor.
Most of it is silly because I have small children,
and don't want to scare them.

Here is one that scared one and grossed the other two out...

LOVE IT!


There are my leftover gourds and pumpkins...

and yes, those are

FINGERS!!!!

I couldn't resist.
I bought them for $1 at the dollar tree,
and used an apothecary jar I already had.
The black netting is the bag the fingers came in,
cut to shreds and laid in the bottom as filler.

For our Halloween party, 
I plan on adding more jars and making a
"mad scientist" lab area.
The jars will be filled with things like:
gummy teeth, chocolate eyeballs
and more.

These three jars cost me about $2 to fill.
See? You can decorate and have fun for cheap.
Stay tuned for more...


Thursday, October 6, 2011

Getting the Halloween Itch...

I have already been thinking about
HALLOWEEN
for a few weeks now.

Last year, I bought up as many cute costumes
as I could find for my little ones 
while they were 90% off at K-Mart, 
so I know I have plenty, I just havent gotten them out yet.

In the meantime, I thought I'd play
with my photo editing software
and post pictures of last year's costumes.

ENJOY!
Wait, what is a picture of
Judy Garland doing in here...
Just joking, that's me as Dorothy.


Ethan went as Dracula~


Owen went as Yoda~
The perfect size, he was.


Happy, he was not.


Baby Estella was a pretty little ladybug~


Snug as a ladybug in a rug!


Super Scary Ethan~

Can't wait for this year!
I LOVE HALLOWEEN!


Tuesday, October 4, 2011

Fall Harvest Wreath


This will probably be my last fall decor post.
(until it's time for Halloween decor)
Unless I come up with another frugal idea...
This one cost me about $8.
I KNOW...
Big Spender!

  • Here's the rundown of my materials:
  • rattan style cheapo wreath from Dollar Tree- $1
    • spray painted with Krylon glittery brown spray paint left over from this project- had on hand
  • fall silk leaves from Dollar Tree- $1
  • larger plastic pumpkin from Dollar Tree- $1
  • set of orange pumpkins and gourds from the dollar tree that I ended up not liking the color of with the other pumpkins and spray painted- $1
    • Rustoleum Antique White- on hand
  • 2 sets of cat tail and leaf sprigs for fifty cents each- $1
  • Nicer and larger set of mini pumpkins at Walmart-$2.88.
  • pinecones- free from my yard
  • glue sticks and glue gun- on hand

(perhaps this is not the last fall decor post...I have more pumpkins)

Here are some during the process pictures-


Here is the 
wreath being
painted.


Here is the 
ugly pumpkin
and gourd
set being
painted.


After everything was nice and dry,
I warmed up my trusty glue gun
and arranged and glued until I liked the way it looked.


Do you like the way it looks?
(Look past that smidgen of pantry...
that IS organized!)


How about a close up of the goods?


Just one more-
in its new official home.
(Until it gets close to Christmas!)


Fall Coffee Table Centerpiece for $1

Here is another fall decor post.
This is one anyone can do.
Really, anyone.

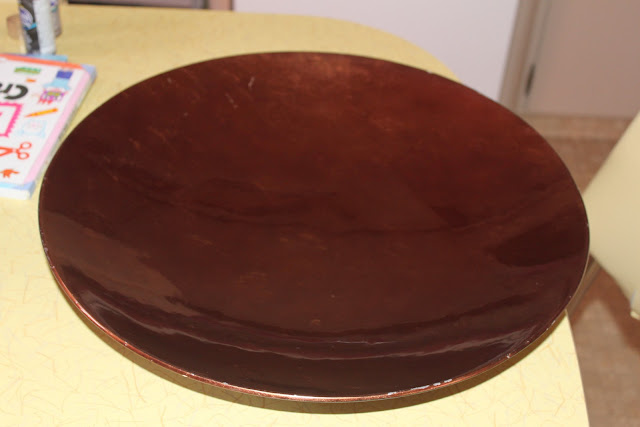
I started with this

I actually liked the original color,
but with the nicks and scratches,
I can see why they would get rid of it.
When I saw it at a garage sale for ten cents, I snatched it up. 

Knowing I had the amazing power of spray paint at my fingertips,
I took it home figuring that at some point, 
I would have the inspiring moment of clarity
where I knew what I'd do with it.

That moment of inspiration came when considering fall decor.
I found a set of cute little white pumpkin candles 
at a rummage sale for fifty cents, 
and had some leftover leaves from this project.


Then I went about painting the (platter?).
I couldn't decide between brown and black.
I chose black thinking that I could reuse that more easily 
in other seasons decor than I could with brown.
Holly or garland and a candle at Christmas, 
a votive in a pile of red and silver kisses for Valentine's Day


Of course I forgot to take a picture of the painting process.
You are lucky to have gotten a before picture,
But here is an after...


All that loveliness for less than a dollar.


LOVES!!!

Sunday, October 2, 2011

Beautiful and Frugal Fall Centerpiece


I got to shop at one of my favorite sales this week.
It is hosted four times a year by the senior citizens organization.
There are so many treasures to be had...
and VERY cheap.

I have been looking for a large bowl or wide vase
to fill and change out with the seasons 
to be used as a centerpiece at my kitchen table.

I found exactly what I was looking for.
And my silly self almost walked away 
because of the $3.50 price tag.

Now, that is one cheap lady.
I'm not proud.

But I did snag it after all.
For Halloween, I thought about filling it 
with plastic skulls and a string of lights...

But for now...
I filled it with pinecones from my yard
that I have had "curing" for a few months,
and some silk leaves from the dollar store.

Filled for fall for a grand total of $1.

ISN'T SHE GREAT?
Are you as overcome with the possibilities as I am?
I am excited to find things to fill it with for each season.

Let's take another look at her.

Just one more...


Wednesday, September 28, 2011

How I met my husband.

You havent heard from me lately

because I am back in school.

I am super busy with six classes.

In my English class, we were asked to write

a reflective essay, telling about an event in our lives that

really changed us and helped us to learn something.

I chose the story of how I met my husband

and thought you may like to hear the story too.

Go here to read it.

Thursday, September 1, 2011

Pennants Inspired by Beatles Lyrics

This will be a quick post.
Another wedding decor project...
I made another one similar.
You can find that tutorial here.

This one is different in only two ways.
1. I used a smaller set of foam stamps
2. I distressed the top triangle with distressing ink.
Otherwise, they are the same.

I am keeping this one and hanging it in
 Miss Estella's room when the wedding is over.
(I am ready)


I just had to share because I 
LOVE LOVE LOVE!


Wednesday, August 31, 2011

Scrap Paper Roses

This project is super easy.
All you need is some scraps of paper and scissors.

Start by cutting out a round "cloud" shape.
Like these:

Then, cut a scalloped edged spiral all the way to the center of your paper...Like this:

Next, starting from the outside edge,
begin rolling the paper up very tightly.
I used a safety pin. The curves you've cut 
into your shape will contour nicely into a beautiful little rose.
Stop rolling when you get to the center of your shape.
The last little part from the center of your "cloud"
will flatten nicely into the outside of your flower.
If you like, now would be a good time to add a spot of glue.

When you stop rolling, your rose should stay together.
If you want your flower to open more, press lightly on the center.

NOTE: Make sure you cut your layers about the same size
or it will not stay together.

When you are done this is what they should look like:

I love them...so much I had to take more pictures...


Now...what should I do with these little beauties?

Escort Card Tree

Yes, you read that right.
An escort card TREE.
I got inspired by these pictures from pinterest.com
Aren't these ideas dee-licious?

So, using these as my inspiration...
I decided to make a "tree" to hang our escort cards on.
I, personally have never seen anything like it.

Here are the materials I used:
  • ugly green plastic pot for a plant- .25 at a garage sale
    • spray painted with a pretty brown spray paint with sparkles in it...paint 3.76@WM 
  • 2 packs of escort cards- .50 at a garage sale
  • 2 long branches- FREE from my yard
  • a decor type bird's nest- .10 at, yes...a garage sale.
  • 3 styles of vintage lace- FREE from a dear lady named Kelly :)
  • 2 pks of stained mini clothespins = 3.98 at WM
    • stained by me with FREE stain I found in our home when we moved in.... you can see that project here
  • "lovebirds"- on sale for .99 at Hobby Lobby
  • various pieces of florist foam- found at various places= $3
  • bag of moss- Dollar Tree $1
  • glue gun and glue sticks
Grand Total: $13.58

First, I spray painted the ugly garage sale planter.

Then, I cut up pieces of foam and wedged them into the pot.

*note- in hindsight, after knocking the finished product off of my dresser, I realized a little bit of weight was needed and added some rocks from my driveway


...and added more foam, making sure to hot glue it all together.

Then, I stuck my twigs into the foam like bunny ears.


Next, I began ripping up pieces of moss and gluing it down to cover the florist foam.


For the next step,
I took my little nest and 
nestled it into a little nook
within one of the branches.
I actually wove the sticks around the branch to keep it secure, then hot glued it into place and glued 
the birds onto the nest.


Next, I took three different styles of beautiful vintage lace and wove them back and forth between the two branches. I used the nooks and crannies of the twigs to my advantage and hot glued them in spots as needed. These will serve as a place to hang the escort cards. 


Lastly, I hung the tiny clothespins onto the lace trim.
Ready to see the finished product?
(well, without the cards...we will do that at the venue)


So stinkin cute.

An unconventional 'Something Blue'...

My friend is getting married.
I have known her seven years and LITERALLY have 
NEVER seen her wear anything but flip flops and sneakers.
She wears flip flops so late into the year, she is usually
 still wearing them at Christmas...not kidding.

So when she was trying to figure out what to wear with her dress,
my first suggestion was flip flops...
"Flip Flops?" she said...
"Yes, flip flops." I said. "We can make them pretty..."
Then I had the idea to make them her 'something blue'.

Here is what we started with.
Plain Old Navy flip flops...$1

Next, I dug into my large tote of vintage lace...

(given to me by a lovely lady named Kelly S...I love to show her what I make with the materials she gave me...gives me a sense of satisfaction that we saved these things and are giving them new life)

and warmed up my hot glue gun.

I chose a length of lace that had a silky ribbon running 
through the center, I thought the ribbon would be a good,
 solid surface to glue onto the shoe.

Here I am gluing the lace on.

When I got to the center toe thingy, I had to think a sec...
I didn't want the lace to be tight around the toes,
I wanted it to lay relatively flat and not be in the way.
What I did was glue it all the way to the center, then backed it up a little and glued over itself...I did this a couple times, creating a semi circle around the toe thing...it worked, just hard to explain.
Other than that, I'd rate this project an 
for easy peasy.

Ready to see what that crazy girl is 
walking down the aisle in?
How cute are they?
LOVE them.

Tuesday, August 23, 2011

Mascarpone and Chocolate Stuffed French Toast with Homemade Strawberry Sauce

Please excuse the Dora plate, this batch was for my kids...I am thinking I need to buy some pretty plates for pics.

This post is three recipes in one.
You'll learn how to make my basic french toast,
stuffed french toast, and homemade strawberry sauce.

The other day when I went to WalMart,
they had packages of strawberries for $1 each.
With all my best intentions of making jam,
I picked up four packages.

Well, as you know strawberries are a fickle fruit.
You must eat them within a day or two or they will go bad.
After the hubby said he didn't have time to help me do the canning,
I set out to use up those strawberries.

We gave a pack to Grandma...
We ate strawberries with breakfast and for snack...
Yet two days later, we still had more berries and they were getting very ripe so I had to make something with the last package.

I started by hulling my strawberries.
(FYI- hulling is just a fancy word for cutting the stem and surrounding white part off)
Then I quartered my berries and put them in a sauce pan with two cups of water, a cup of sugar, half a tsp of salt and a half cup of clear corn syrup. Bring to a simmer and let it boil lightly 
for ten or so minutes. It will look like this:

Then, use a slotted spoon to remove the berries and set them aside, then put the mixture back on the heat and bring to a rolling boil for a few minutes to reduce and thicken the mixture.


Don't let it boil over.
You will have a huge mess.


After your mixture has thickened, add your strawberries back in.
(the reason you take the berries out is so that they keep their shape and not turn to mush)
To store, keep in an airtight container for up to 2 weeks.

You can also freeze this sauce:
Once its completely cooled, 
store in freezer containers for up to four months.

ON TO THE FRENCH TOAST-
Here is my basic french toast batter we will be using-
(I find one egg makes 2 pieces of french toast, 
so multiply accordingly to suite your needs)
Yields- 8 pieces of french toast or 4 stuffed

8 pieces of bread
4 eggs
pinch of salt
1 tsp of vanilla
a good shake of cinnamon
whisk together in a flat baking dish (I use a pie plate)
soak bread in mixture long enough to coat
cook over med-high heat just as you would grilled cheese

HOW TO STUFF FRENCH TOAST:
Mix together softened mascarpone cheese with chocolate chips.
(mascarpone is like a lighter, Italian version of cream cheese found in the specialty cheese 
sections of most larger grocery stores, I found mine at WalMart.)
Spread your mascarpone mixture onto one side of two pieces of bread and put them together like a sandwich.
Press lightly around the edges to form a seal 
so the goodies stay inside the french toast.
Dip  and coat your "sandwich" in the egg mixture, 
and cook like a grilled cheese.

Yum... I just made myself hungry for it all over again.
Hmm...I have leftover sauce and cheese filling,
I think I am going to go make it again right now!

Here it is again in all its glory...
Yes, in all its D-D-D-D-Dora glory. LOL

Thursday, August 18, 2011

Super Simple Headband

This project is idiot proof.
You just cannot mess this one up,
it only takes as long as it takes to warm up your glue gun.

I started by buying a pre-made ribbon wrapped headband for .97,
and a sequined leaf already attached to a piece of felt for 1.97.


I figured out where I wanted the leaf,
and hot glued it into place.


Then, I tried it on my favorite model...


Super Cute, Stella!