Thursday, June 30, 2011

So Many Crafts, So Little Time-


I have been collecting craft fodder at garage sales and thrift stores for a few months now...
I have amassed quite a collection of items to overhaul.
Here are some of my recent thrift store highlights...


13 craft paints, all full or nearly full,
2 bottles of crackle medium,
1 base coat, 1 tacky glue,
1 transfer medium, 1 gel stain
and two pks of nail in hangers for frames.

ALL FOR $7.90


Corkboard tiles for .25 a piece


All these frames for $4.50
I have a special idea for those small cross-stich ones, stay tuned for that...


And two lengths of coordinating fabrics,
I'd say they were matching but the dots are a different color on each one.
They are the perfect size to turn into a pillow...
what to do with them,
and with what time?
50 cents a piece.


There's so much more to show you, but alas, it is Thursday...
garage sale day!


I'm outta here for now.


Wednesday, June 29, 2011

Bathroom Scale Makeover

I cleaned and scrubbed my bathroom this morning.
As I was putting everything back, I considered throwing away my hubby's scale....shhhh.
I dont use it, it is insanely ugly and beat up, but I know he wouldn't be happy if I got rid of it.

With no money to buy a new one, which I would have preferred, 
I decided it was time to give this thing a facelift.

Here is what I started with:

Yuck, huh?
Actually, this is AFTER I cleaned and 
scrubbed it into oblivion...

And wrestling that sticky foot pad thingy
off was a chore...

It was rusty and gross...


Next, I decided what it needed was a
good coat of spray paint, my bathroom
rugs are black so I figured
a black base would be perfect.
Of course, I taped up the dial 
so I didn't get paint on it.


Then I painted it...
I got the edges and around the dial
really well but left the inside unpainted 
because I was going to put a piece of 
scrapbook paper on it anyway.


While my paint was drying, I picked out
my paper. I realize that it is probably
not a lifelong surface, but I will clear
coat it and when it wears out,
can hopefully just buy a new one...
I would say, "Hubby, I recycled
this once already, lets just get a
nice new one." and he'd agree.
ANYWAY, I picked this pretty
 blue and green because I am
painting my bathroom green
and its pretty dark so I
am hoping it wont show dirt.

After applying my old foot thingy to a sheet of paper (it was super sticky) and cutting it out, I had a template and cut my scrapbook paper with it.


It took a couple of "shaves" to get the hole
around the dial right...once I did,
I placed my paper on the scale to 
see how I liked it....

I like it...
But...
Its not right yet.

Those corners have got to go.


So off they came,
I used a rounded corner punch.


First, I glued her down...
Then I put a thick coat of
Mod Podge on top.
Don't worry...
it will dry clear.

Take care to smooth out any
bubbles and rub the edges down
to get a good, secure seal.


Then, let it dry...for a while, like hours...sigh. 
I hate waiting, I am so impatient.

After watching the clock for an hour, I spray painted a clear coat on top of the scale
and once it was dry, I stood back and admired what was once an UGLY, rusty mess.


Tuesday, June 28, 2011

What I've been up to...

I have been so busy, if I have any actual daily readers, you are probably wondering where I 've been.
Well, I have somehow just adopted the role of wedding coordinator for one of my very best, most dear friends. I love this friend dearly, but I am not a decorator. I am a hack, mostly. She wants to do a "forest wonderland/simple, somehow a bit barn-inspired type wedding with a little sparkle"
on way less than a shoestring budget. So I am trying to come up with some cheap or free ways to decorate the indoor and outdoor space for the ceremony AND reception...I will be attempting to make making table number cards, centerpieces, pretty much anything thats NOT the actual food, dj, venue, photographer, etc. Those basic wedding things have been taken care of. AND this is for 100-150 people...AND its in almost exactly two months....YEAH, we are in over our heads I really bit off more than I can chew on this one. On top of it all, my friend is really only offering opinions, not money or design sense to help out...yikes...

I am also a master garage saler/thrifter...I see the vision that most people cannot.
I have picked up some great stuff for us to use so far...


50 place setting cards in pkg for 50 cents, thats not enough so we plan on making about 30 more, maybe in the shape of hearts, and writing two people on each one...like MR and Mrs Such and Such...
alternating and hung up something like this...


I went to one sale where they had a bunch of fake floral supplies and found about 10 little birds nests decorations, we plan on putting little white tea lights candles in them. They look exactly like these, just imagine them in the entry, some on the food tables, etc. 

There was some other stuff in the box like pine cones, raffia, ribbons and some pretty vining silks...and I got that whole box for 5 bucks! I just looked into buying more nests and they are retailing for 2/3...yikes.


I had a very dear lady give me a bunch of her mother's old crafting supplies because they were going to waste and she was wanting someone to get some use out of them. Thanks again, Kelly!
In the stuff she gave me was probably no less than 200-300 yards of lacy ribbons...beautiful vintage lacy trim which I plan hanging from trees and draping here and there (and can still reuse).
 There was also a bunch of pink ribbon and a whole box of 30 white tea lights....perfect.

Here are some of my inspiration photos:


SO thats what I've been up to, thats why I dont have all the time in the world to go looking for projects around the house, though once I start making the stuff for her, I will post about it.

Till then, eat up these lovely ideas from Pinterest.
And please, let me know if you have any ideas or inspiration to pass along to me!


Monday, June 27, 2011

Taking the mess out of pancakes-


I have toddlers and try to avoid giving them things that are super messy to eat. 
Call me lazy if you want, Whatever, I just dont like cleaning up unnecessary messes.

I have adapted a basic pancake recipe to include sweetness 
without having to give your child syrup...syrup is a mess.

I just add a few Tbsp of fruit preserves to the liquid in my pancake recipe, 
breaking it up with my hands to create chunks but not mixing it all the way up.


Then, mix up your batter and cook them as usual.
my kids don't even ask for syrup...and think of all the sugar they aren't getting!

Friday, June 24, 2011

Old Navy Tanks for $2

Starting TODAY for facebook fans and tomorrow for everyone else....Is there anyone else?
Enjoy up to ten basic ribbed tanks IN STORE for only $2 a piece.

WITH COUPON ONLY...
follow this link to print the coupon.

I know I will be there!

Thursday, June 23, 2011

The Day I Saved 90% at Wal-Mart

WOW is all I can say. My local Wal-Mart in Celina Ohio just did a major remodel and for some reason, downsized their craft section...

So some super items at outrageous prices made it into clearance...and probably right before I got there judging by the insane amount of awesomeness that was there.

I went nuts...


These frames came in a pack of six...
2 8x10's and 4  4x6's in each pkg...for $2
That's right 12 brand new frames for $4...LOL

Regular price unknown but was compared to items priced at about $15 or more per set.


These paint rollers were originally:
12.97 for the large ones- I paid 3
5.97  for the small ones- I paid 2
The drop cloths were orig $6, 
but I paid 1.25 each


Next up is a bead spinner for $2...orig $20.
A electronic bubble blower for weddings,
originally $30, I got it for $3.
Also a Crayola 3D sidewalk paint kit,
orig 14.97, paid $3.


And these are t-shirt embellishment kits, each kit has over 100 pieces in it and cost $10...
I got these for....
DRUMROLL....
.25 each.
Yes, a quarter.


SO, if you've been doing your math...that is a total of $236 worth of merchandise for a mere $22.25.
That is a savings of 90%.
Yippie for THAT sale day!
LOVE IT!

Wednesday, June 22, 2011

HAPPY BIRTHDAY TO ME!

It's my birthday and as I was printing out my multiple free birthday offers, I thought to myself, "Self, maybe my friends out in blog land would like to know how to sign up for all these goodies too..."

The trick is to sign up ahead of time on the websites so that you can get your freebie as soon as possible. Some sites have a club to join, or say become a member...you're smart, you can figure it out.

This year, I had a free meal from Captain D's, a free shake from Arbys, free dessert from Applebees and Melting Pot, free strawberry coupons, free burger and fry meal from Ruby Tuesday, free meal AND dessert from Spaghetti Warehouse, free Rooty Tooty Fresh and Fruity Meal (LOL, the name of that makes me smile) from IHop, free meal from Country Buffet, free meal from Sonic and a ton of % off coupons for sites that sell products I already love :)

I was going to make a list but found a very nice complete list you can link to over here.

Happy Birthday early, enjoy your freebies.

Tuesday, June 21, 2011

Hair Bow Organization-


I was sick of walking into my daughter's room and finding this...

For some reason, my daughter likes to dump out all of her hair stuff onto the floor and play with them.

I have seen cute little bow hangers at various stores, but the really cute and durable ones run something like twenty dollars!!!

Not if I can make it for a lot cheaper!

So I decided to make one for my own....Unfortunately, I didn't remember to take pictures during the process. :(

I started by buying a 97 cent wooden oval from WM, a can of pink spray paint and three spools of coordinating ribbons...the materials cost me about 12 dollars...BUT I only used a small portion of the ribbons and spray paint, so I have those for another project....or two.

I spray painted my wooden oval and once it was dry, decoupaged a pretty piece of scrapbook paper onto the front. I had some glittered cardstock letters on hand and decoupaged them on top of the scrapbook paper and let it all dry for a couple hours. When I went back to it, it was dry and ready to go...I then nailed a hanger onto the back and started cutting my ribbons. I cut one strip of the wide ribbon and two each of the other two types of ribbon, then arranged them and hot glued them onto the back of the wooden oval...are you ready to see it? Please look past my yucky old wallpaper...

Monday, June 20, 2011

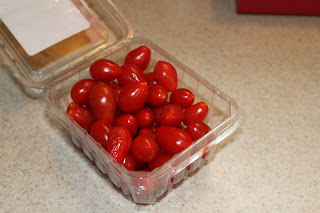
Using up old cherry tomatoes-


I hate to waste, so anytime I see produce turning, I find a way to use them up right away. Here are some other examples....for avocadosbananas, and raspberries.


Anyway, this time it was cherry tomatoes going bad when I woke up...


Put your washed and dried cherry
tomatoes into a baking dish with a few 
Tbsp. of olive oil, a few peeled garlic 
cloves and salt and pepper. 
Mix and roast in a 400 degree oven 
until the tomatoes start to 
shrivel up and pop open, 
my oven takes about 15 minutes.


Then you have to help them along a little with your potato masher, on harder chunks it helps to rock the masher back and forth over the product. I learned the hard way to use a deep dish pan so you 
aren't splattered with hot tomato juice.


Keep on smashing until you get a nice, even sauce.


Next fold in cooked pasta, I think that cappellini works best because the sauce gets integrated into the pasta better.


After your tomato mixture and pasta are well blended, top with finely shredded parmesan cheese and adjust the salt and pepper to taste.


And there you have it, a clever way to use up tomatoes that are passing their prime, 
and it only takes about 15 minutes!


Sunday, June 19, 2011

Outsmarting my Hubby-Homemade Sorbet


I am on a mission to use every small appliance in my pantry soon so that my husband doesn't have an excuse to get rid of anything.


One day last week, I woke up to this...

raspberries going bad. Ugh.


I saw it as a perfect excuse to use
my ice cream/sorbet maker that usually sits
and collects dust..


For the full recipe, go here.


Start by pureeing the berries in your food processor.


(Lucky me, I got to use two appliances for this project)


Next, you need to separate the seeds from the pulp.     I used a fine mesh screen, but if I had been thinking, I would have used the long forgotten food mill I just found while cleaning out the pantry,
having successfully used THREE items for
one project...


Then, boil your sugar and water, essentially making a simple syrup just like in my coffee syrup tutorial, over here.


Um....yeah, STILL too hot.
 Next is the part I have the most trouble with.
PATIENCE! The syrup has to cool to room 
temperature, and I am SO impatient that I 
had to watch the temperature go down.


I eventually left the room and started 
another project so when I came back to it, the syrup 
was exactly where I needed it to be...


After the syrup has cooled, mix the berry puree and 
syrup mixture together adding the corn syrup and 
blending well. Then, put that mixture into your ice 
cream machine and turn it on.

NOTE: your ice cream frozen sleeve insert thingy
must be frozen SOLID for this to work...
no freezing it for a few hours and thinking it will be OK. 

No, none of that, it must be frozen absolutely solid.

Oh, and dont forget the paddle arm, like I did...ha!

EVENTUALLY...
you will get frothy, then slushy, then frozen sorbet....oh and if you are wondering why there are seeds after I removed them....I added some back in, and some chopped raspberries because I wanted more texture. I havent decided if that was a good idea or not, all I know is that it turned out DELICIOUS!

Saturday, June 18, 2011

Oh My Goodness, the state of my pantry...

Certain things escape me apparently when I am super focused on something else thats really important...school, kids, etc.

FYI- the empty spaces are only there because I had just moved 4 cases of canned goods....LOL.

My pantry has gotten away from me.  It has grown into a living thing, eating up countless forgotten items and hiding a family of mice....ew. I live in an old country house in Ohio....I think it's inevitable that we get them here and there, but I am not providing them with a place to hide. So, its time to clean the pantry. Its embarrassingly messy...

So, I am extending my posting of this and many more projects till Monday, after the tragedy that is my pantry has been fixed. Oh my, the day I have ahead of me....

Thursday, June 16, 2011

DOWN TIME-

I apologize for the lapse in blogging...my middle child has a very bad virus that it finally seems he may be getting over, so I've had my hands full with that and work. Also, a high school friend's son just died so I have been cooking all day, making food for her and her family in their time of need. I have been keeping up on my "Outsmarting my Hubby" projects though, and have plenty to write about once I get the chance. Come back tomorrow for new posts! Thanks for reading!

Wednesday, June 15, 2011

Biting off more than I can chew?

As if I didn't have enough going on in my life, I have taken on yet another "project"...except this one is a doozy. My best friend is getting married on a budget in a few months and has done the planning on her own, she has the dj, the venue, the food figured out, the honeymoon, the dress and....thats about it. With the wedding approaching quickly, it became apparent that she was going to need some help, so I offered to decorate the venue and take care of all the little details that she was neglecting. So now, everything from decor to favors, to flowers and linens, guestbooks, table numbers and aisle runners and a million other details....its all on me. Whew, did I just bite off more than I can chew here? YIKES!

Tuesday, June 14, 2011

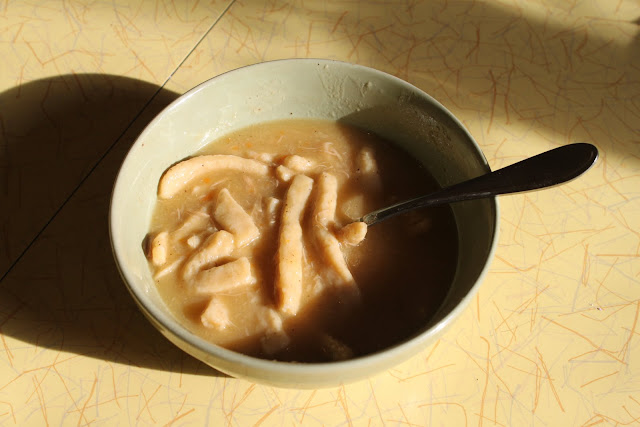
Nothing says LOVE like homemade noodles...

I love carbs, sure they want to glue themselves to my midsection, but I love them still...
NOODLES have got to be my #1 favorite carbohydrate. I love pasta.
Sometimes, I find a dish at a restaurant that I like so much I have to learn how to recreate it.
This one was inspired by Bob Evans Chicken and Noodles.

  • I started with a whole chicken, cut the legs, wings and thighs off and set them aside.
  • Then, I took the carcass with the breasts still attached and cut the breast meat off and put it aside as well. (I wrapped the breast meat up and put it in the fridge for another dish because I have learned to skimp on meats in casseroles and soups...saves money and calories)
  • I washed and cut 3 carrots, 3 stalks of celery and one large sweet onion into huge chunks, set aside.
  • In a large, hot stock pot (med-hi), add about a 1/4 cup of olive oil and your veggies, legs, thighs and wings, breastless carcass, S + P, a big pinch of rosemary and thyme, 1/2 tsp. each of poultry seasoning and garlic powder, 3 whole bay leaves and 3 crushed garlic cloves. Sautee everything together on medium high heat, letting everything brown up on all sides....this means you have to stir often and keep an eye on it....it will probably take ten minutes.
  • After everything is nicely, LIGHTLY browned, add about 2 gallons of water and bring it all up to a rolling boil.  Boil mixture for about 10 more minutes and take off the heat. REMOVE CARCASS AT THIS POINT BEFORE ALL THE TINY BONES START TO FALL APART!
  • After its cool enough to handle, remove the veggies, garlic, bay leaves, chicken parts and any other solids from the soup and set aside. 
  • Put the broth back on the heat and lightly boil it down, reducing the liquid by about half, then take off the heat and add half a stick off butter.
  • Once your chicken pieces are cool enough to hold, pick all the little yummy bits of chicken off the bones and put it back in your broth.
  • Bring back to a boil and add your noodles, I have not been able to find the type I was looking for in the store, so I decided to make my own. I wasn't crazy about the results so I am not going to post the recipe, but it was just a standard egg noodle cut thick. 
  • Once your noodles are cooked through, taste your broth and adjust your salt and pepper as needed.


Monday, June 13, 2011

How I get $25 restaurant gift certificates for $2-

I am a member of a super fun site called Restaurant.com You can buy discounted gift certificates to 1000's of places...NOT corporate places usually, but I like that better. If you sign up to have regular emails sent to you, they periodically send promotional codes to enter that makes a $25 g.c. only $2!!! There are usually stipulations, but I have saved a ton of money this way AND have found so many cool restaurants along the way that I might never have had the opportunity to try.

Here's a link:
Best Deals and Discounts on the Best Local Restaurants – Save Money on Food with Restaurant.com

Outsmarting my Hubby...

OK- So, really I am not being bad...not exactly. My husband thinks I have too many things that I don't use and has recently mentioned possibly getting rid of said items...Uh, no...I don't think so. He and I have different views on what types of items are "keepers". He would honestly prefer for me to get rid of everything that's not in daily or at least weekly use. Not me. If I use my huge turkey roaster only once a year, I'm keeping it. What about my food dehydrator or ice cream maker? Or my collection of vintage silver platters or my beautiful wooden salad bowl set...I dont necessarily USE these things, but I am certainly NOT getting rid of them. I am in culinary school and plan on doing some private chef/catering and see NO reason to get rid of things I will have a future use for. SO....I needed to come up with a way to keep my stuff. Hmmmmm.... 


Well, he cant complain about me having stuff I dont use if I use them...
So my goal this week is to each day, use one of my kitchen gadgets that dont see much rotation.
AND, I'm going to blog about it for all of you....FUN!


Today I woke up to browning apples. I hate to waste, I tend to make applesauce or apple crisp when my apples start turning, but today I decided to break out my massive food dehydrator. We got it for Christmas 2010 from my Grandma Carole. Thanks, Grandma!


I sliced my apples super thin, cutting off any brown...this is way easier with a very sharp knife. I have J.A. Henckles and ADORE THEM, but they were very expensive. Awesome investment....but I digress.

Then you arrange them in a single layer in your drying trays.


Then stack it all back up together and turn it on, using your manual to decide on the temp...mine says 135 for fruit.

Sometime today we will have healthy apple chips for snacking on, the kids will love them!